How to use Sketchup models in Unity
I’m currently working on a remake for my Light Asylum games (1 and 2) and, at the time, I made most of the visuals of the game in Sketchup. Sketchup is amazingly easy to use and I didn’t want to spend a lot of time learning 3D softwares to make a simple room. At the time I was making a 2D game so my only concern was how to render the scenes in the best way possible. But now I want to reuse them in my remake and make them really 3D so I can navigate them in real time.
If anyone tried to do this in the past it was something a little bit hard. Somehow my models were always incorrect or untexturized or something! The fact is that Unity has come a long way and the compatibility has become very good with a lot of 3D formats.
This post is going to be about the current versions of Sketchup Make 15 and Unity 5.1. In the past we could use FBX to export from Sketchup, but now we only have DAE and KMZ. Good thing Unity seems to be happy with DAE, so that’s the one I’ll use in this tutorial.
How to export from Sketchup
So, let’s start with a very simple example and then we’ll talk about issues you might expect.
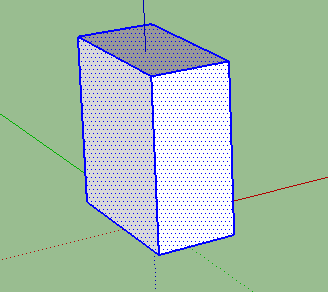
Let’s start by creating a very simple object, like a box, in Sketchup that we will export and use in Unity.
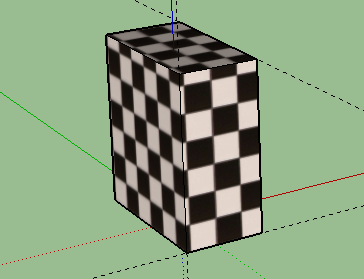
To make the example a little more complete we can add some texture to our new box.
Then, if you go to File > Export > 3D Model you get to choose a place to save the exported version of your model and the format you want it exported to. Let’s choose “Collada File (*.dae)” and then click on the Options button right next to the format name. In that box you have several options for the exporter to consider while converting the format of your model.
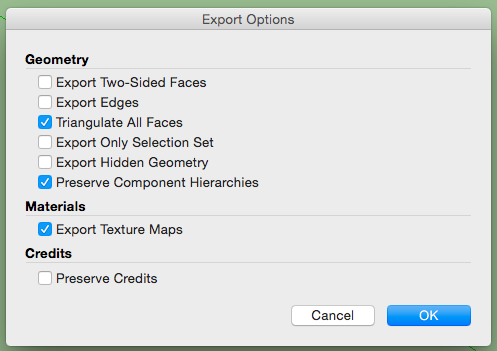
Let’s select “Triangulate All Faces“, “Preserve Component Hierarchies” and “Export Texture Maps” and leave everything else unchecked. If you read other tutorials (like I did) you will probably remember that some of them tell you to check the “Export Two-Sided Faces“. In the next chapter I will explain why that’s not such a good idea.
Another thing you can do, which I find very useful, is to export only the selected object. Although I have the whole scene in one Sketchup file, I export each object independently to Unity. But it’s a question of preference.
Make sure you save your exported file into your Assets folder inside your Unity project folder. Since this will generate both a file and a folder of materials, I usually put it inside it’s own folder with the name of the asset, but that’s just a matter of choice.
How to use it in Unity
When in Unity you just need to drag your new asset into your scene.
In this case we’ll have something like this in our Scene:
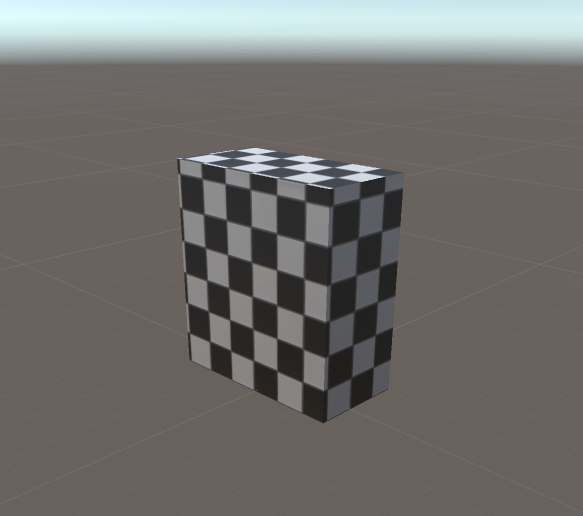
And that’s basically it! Our textured model will be in our scene and if it had any kind of hierarchy inside the Sketchup scene it will be preserved inside Unity.
Possible issues
The fact is, if this was so simple I wouldn’t probably create a tutorial for this. The reality is a lot more painful and I had a lot of problems with Sketchup to Unity process.
I will write about the two main issues I encountered and give you my solution. Keep in mind that it’s my solution and there might be better ones out there.
Problem 1 – Scale
In this example I had to move the camera back to be able to see the box. It was that big! In Sketchup the height of the box, for example, is 1m, but in Unity its around 38.4 units. I don’t really understand the connection between both. One way of making sure the objects coming from Sketchup have the size you want is to figure out the proportion between the size you want them to be in Unity and their actual size and use that as a scaling factor. Instead of changing the scale while the object is in the scene you can change the scale on the model itself in your Assets folder.
To do that you click on the object in the Project dialog and then you can scale it in the Inspector dialog
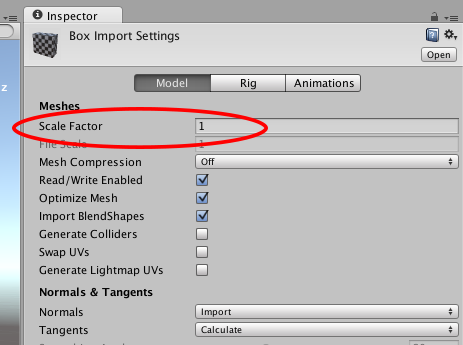
After that, every time you use that object it will have the size you wanted. This will be applied to every instance of this object, even if it’s already in the scene.
Problem 2 – Hidden back faces
One problem that was making me mad was that models I created long ago, as well as models I’ve taken from the 3D warehouse (Sketchup’s repository of free models), were sometimes very broken when imported in Unity. That happened a lot with the FBX exporter, although it seems a lot better with the DAE exporter in the current Sketchup.
So when can this problem happen in the current version of Sketchup when exporting in DAE? Imagine we get our box and use the right button click of the mouse on top of one of it’s faces, and then we select Reverse Faces.
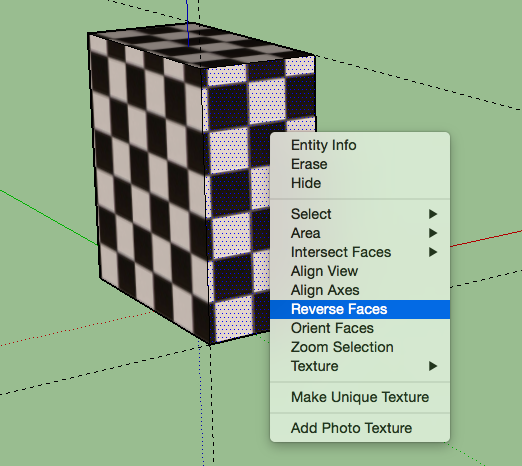
What will happen is that Sketchup will now turn the face around. Sketchup let’s you apply materials to both sides of the faces and each side is a solid face. As you can see, when we select this option we still have a face but with a different material (in this case the default back face material).
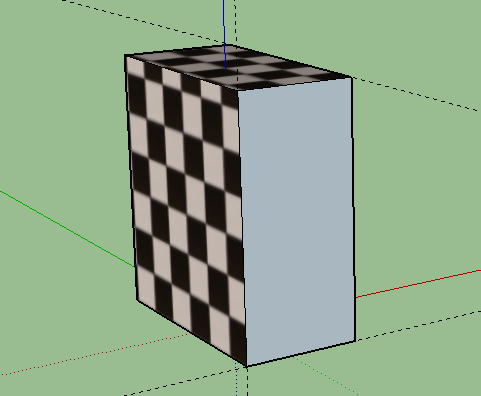
Let’s see how this is translated into Unity after exporting.
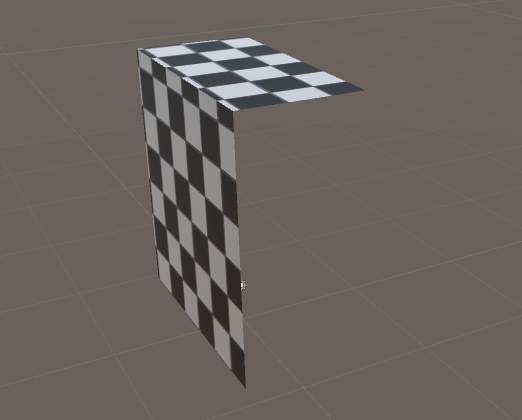
The face is not appearing! I had several objects broken because of this (it doesn’t seem to happen if I also applied a texture to the back of the face). Why does this happen? It’s actually a simple answer. 3D engines for games need to be fast and one of the quickest and easiest techniques for an engine to discard things that aren’t needed is by discarding back faces. The engine knows if a face is a back face by calculating it’s normal, which is an imaginary vector that comes out of the face in the direction the face is facing (this is calculated by the order that the vectors of that face are represented). But for this example let’s not dwell a lot into the math, but let’s assume back faces are facing away from the camera.
One of the solutions presented in a lot of tutorials I read is to choose the export option Export Two-Sided Faces while exporting. This works because the exported file will create 2 faces for each face you have in Sketchup each facing the opposite way of each other.
1 – Each face is now translated into 2 faces, which makes the model bigger;
2 – Back faces are usually facing the inside of closed models, so the back faces are useless because they well never be seen since they are blocked by the faces that are facing the camera. But still, you’re making the engine think they might be seen because they are also facing the camera. This will make the engine make a few more calculations to understand that those faces are in fact covered and not seen.
So, the best way to make a good well behaved model to use in Unity is by making sure back faces are never facing the camera. That process is done by selecting those faces and choosing the option I’ve shown before Reverse Faces. But how do you know if the face is a back face? The back faces that gives you trouble are the ones that you didn’t apply a texture to, so the ones that have the default back face texture. So let’s make that texture very obvious!
To do that we go to Window > Styles, and we’ll get a dialog window that has the settings for the style you’re using.
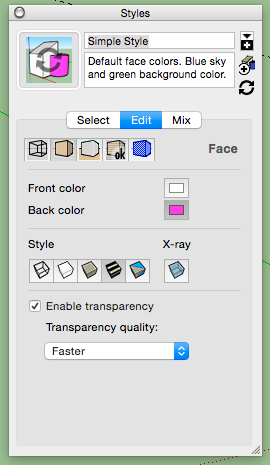
In the dialog you go to the Edit tab and then you select the second set of options, which regard your Face Settings. There you have the Back color option which defines the default color for back faces. Select something very visible. I usually pick a strong Purple because I hate to see it and makes me want to make a well behaved model! Our box now looks like this:
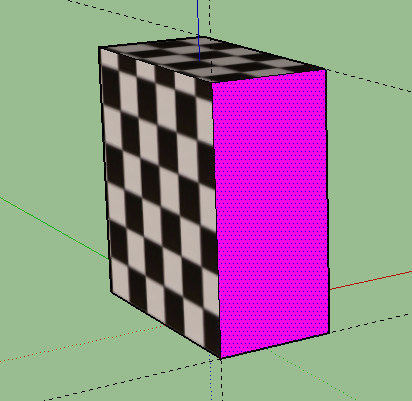
Now you just need to reverse the purple faces to fix it!
Conclusions
Sketchup is an amazing tool. It’s amazingly easy to use and it’s very powerful. You can also use it to make your 3D printer models. After I got used to it it’s a fine way to create your models to use in your Unity games.
If you know a better way to anything I talked about, please let me know and leave a comment. You can also leave other tips which I would love to know about.
5 Comments
Thanks for posting this. I was importing my model from Sketchup into Unity 5 and ran into the same scaling issue. I even tried changing the scale units on Model Info in Sketchup, but that didn’t seem to help. I’ll try changing the scaling factor in Unity and see if that helps.
Adjusting the scaling factor does help. Now when I put my first person controller in the scene and walk around everything is the right scale.
Now the issue I’m having is walking around feels like running. I’ve adjusted the walk, run, and jump speed as well as the step interval, but I’m wondering if there’s a better way to get everything to gel better.
Hi! It’s an old post but you gave some answers i was really looking for since the backface stuff is driving mad! I’m trying to import a somewhat complex building into unity. Since there are some closed room (like bathrooms) there has to be a backface visible (let’s say the one inside the bathroom), how do i do that without exporting the whole lot as double sided? I hope i made myself clear, thank you in advance for your answer!
Hello! I wrote this post because it was also driving me mad 😀 As I explained in the post, when in Sketchup, one of the things that helped me the most was changing the default back face colour into something very visible (shocking even). If you’re seeing that colour somewhere it means that the face is backwards. Then you just need to select those faces, use the second button of the mouse and choose “Reverse Faces”.
I’m very sorry I didn’t see your comment so I could comment on it before. My website seems to have not been warning me about comments in a while.
How are you handling the walking around? Are you using Unity’s component? Or did you make your own?